
Test reporters
Buster.js のテスト結果を出力する方法を決めるreportersという機能がある
reportersの種類
現在利用できるreportersの種類は下記に書かれているものと、独自に定義したreporterを利用できます。
デフォルトでは、 dots が使用され、buster-test の -r/--reporter オプションで指定することができます。 -r/--reporter オプションの詳細は、コマンドライン上で下記のようにして見ることができます。
$ buster test -h reporters
独自に定義したreporterを使う
reporter機能は自分で作成したものを利用する事ができます。
See also
- busterjs-kumite/reporters at develop · azu/busterjs-kumite · GitHub
- cd `git rev-parse --show-toplevel`/reporters
まずは、custom reporterを作成します。
/busterjs-kumite/reporters/reporter/myReporter.js
var terminal = require("buster-terminal");

module.exports = {
    create : function(opt){
        var reporter = buster.create(this);
        opt = opt || {};
        reporter.io = opt.io || require("util");
        reporter.term = terminal.create(opt);
        reporter.testCount = 0;
        reporter.contexts = [];

        return reporter;
    },

    listen : function(runner){
        runner.bind(this, {
            "suite:end" : "suiteEnd", "context:start" : "contextStart",
            "context:end" : "contextEnd", "test:success" : "testSuccess",
            "test:start" : "testStart", "test:deferred" : "testDeferred",
            "test:failure" : "testFailure", "test:error" : "testEnd",
            "test:timeout" : "testEnd", "context:unsupported" : "contextUnsupported"
        });

        return this;
    },

    suiteEnd : function(){
        this.io.puts("1.." + this.testCount);
    },

    contextStart : function(context){
        if (this.contexts.length == 0){
            this.testCount = 0;
            this.contexts.push(context.name);
            this.io.puts("Browser : " + context.name);
        }else{
            this.contexts.push(context.name);
            var space = new Array(this.contexts.length);
            var color = "yellow";
            this.io.puts(space.join("\t") + this.term[color]("<" + context.name + ">"));
        }
    },

    contextEnd : function(){
        this.contexts.pop();
    },

    contextUnsupported : function(data){
        var name = data.context.name;
        var features = data.unsupported;
        var plural = features.length > 1 ? "s" : "";
        this.testCount += 1;
        this.io.puts("not ok " + this.testCount + " " + name + " # SKIP " +
                "Unsupported requirement" + plural + ": " + features.join(", "));
    },

    testStart : function(test){
        this.testCount += 1;
        var space = new Array(this.contexts.length + 1);
        this.spacer = space.join("\t");
        this.test = test;
    },

    testSuccess : function(test){
        this.test.passed = true;
        this.testEnd(test);
    },

    testDeferred : function(test){
        this.test.deferred = true;
        this.test.comment = test.comment;
        this.testEnd(test);
    },

    testEnd : function(test){
        this.io.puts(this.spacer + label(this.test) + this.testCount + " " +
                this.test.name);
    },
    testFailure : function(test){
        this.io.puts(test.error.stack);
    }
};
function label(test){
    var label = "";
    if (test.deferred){
        label = "✎ ";
    }else if (test.passed){
        label = "✔ ";
    }else{
        label = "✘ ";
    }
    return label;
}

module.exports["test:error"] = module.exports.testEnd;
module.exports["test:timeout"] = module.exports.testEnd;
とりあえず、このcustom reporter(myReporter)を使ってテストを実行してみます。
buster server を行なって、ブラウザをキャプチャさせた状態で、 busterjs-kumite/reporters に、test.sh というファイルが用意されているのでそれを実行します。
Note
Windowsはshの方法は実行できないかも
$ sh test.sh
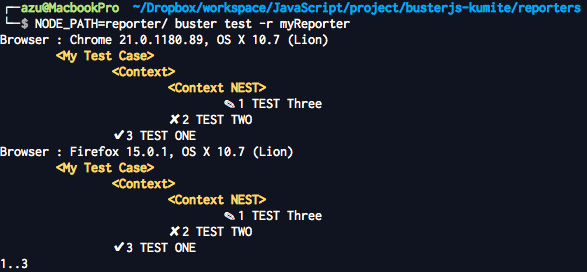
Browser : Firefox 13.0.1, OS X 10.7 (Lion)
<My Test Case>
<Context>
<Context NEST>
✎ 1 TEST Three
✔ 2 TEST TWO
✔ 3 TEST ONE
Browser : Chrome 20.0.1132.57, OS X 10.7 (Lion)
<My Test Case>
<Context>
<Context NEST>
✎ 1 TEST Three
✔ 2 TEST TWO
✔ 3 TEST ONE
これのように、自作のmyReporterを使ったテスト結果を実行するには、 -r/--reporter オプションでmyReporterと指定する必要がありますが、 適当な場所に作っただけではnodeの require() からは読み込めないため、 NODE_PATH に myReporter.jsがあるディレクトリを追加して、 require("myReporter") で読み込めるような状態で buster test -r myReporter して実行します。
つまり、以下のように NODE_PATH を設定してテストを実行させています。
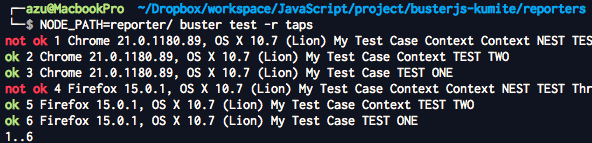
NODE_PATH=reporter/ buster test -r myReporter
Buster.JSの仕組み的に、 buster-test / reporters.js にて、 -r/--reporter オプションで指定したモジュール(又は BUSTER_REPORTER の環境変数でも指定可能) を読み込む処理が行われています。
この読み込む処理は、単純に require("reporter名") しているため、NODE_PATHを使ったモジュールへのパスの通し方以外でも、 buster test 実行前にrequireで読み込めるように準備しておけば良いことになります。
custom reporterの書き方の詳細はドキュメントや既存のreporterが参考になります。
reporterに色を付ける
既存はspecification等のreporterには色が付けて出力されますが、 このようなターミナル上の色を付けるのには buster-terminal が利用できます。
taps reporterを参考に見ていくと、最初に var terminal = require("buster-terminal"); というように buster-terminal モジュールを読み込んでいます。
/busterjs-kumite/reporters/reporter/taps.js
var buster = require("buster-core");
var terminal = require("buster-terminal");

module.exports = {
    create: function (opt) {
        var reporter = buster.create(this);
        opt = opt || {};
        reporter.io = opt.io || require("util");
        reporter.term = terminal.create(opt);
        reporter.testCount = 0;
        reporter.contexts = [];

        return reporter;
    },
このように、読み込むにはbuster-terminalモジュールへのパスが通ってないといけないので、 package.jsのdependenciesにモジュールを追加して置くのが楽でいいです。
相対パスしていでも読み込めるので該当するパスにファイルを置く方法でもできなくはないです。
"dependencies": {
    "buster-core": ">=0.6.2",
    "buster-terminal": ">=0.4.1",
}
使い方として、reporterのcreateで terminal.create(opt); して返って来たインスタンスを使います。
buster-terminal/lib/buster-terminal.js を 見ると、
term["green"]("色をつけたい文字列")
などのようにANSIカラーをつけたり、文字の一度調整等ができる関数が入ってるようです。
このように、Buster.JSのreporterはJavaScriptで比較的簡単にいじれるので、オレオレreporterを作って見るのもいいかもしれません。